- Install the extension
You can follow the Extension Install Guide.
- Configure INIT Settings button
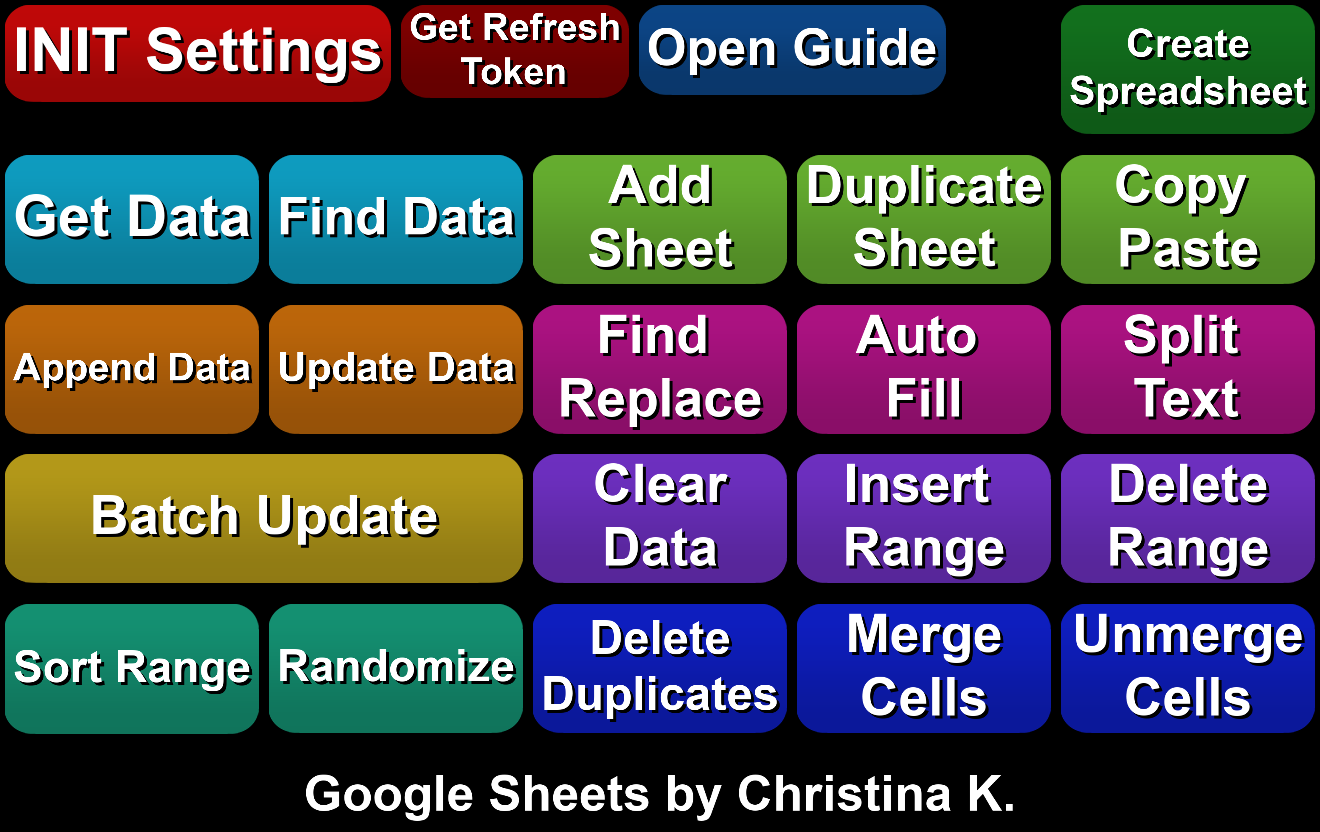
You should see a new premade deck in your SAMMI. Right click on the red INIT Settings button - edit commands.
Refresh Token
- you need to allow the extension to access your Google Sheets and retrieve the refresh token. Please follow this link and all its instructions after you get redirected.\
Note: This will allow the extension to read and modify only files that have been previously created with it. It does not have permissions to do anything else.
Api Key
- you will need your own Google API Key.
Follow the video guide showing all the steps below:
- Go to the Google Cloud Console.
- Click the project drop-down and select or create the project for which you want to add an API key.
- Click the menu button and select APIs & Services.
- Click on the + Enable APIs and services. Search for Google Sheets, click on the search result - Enable. Repeat the same process for Google Drive API (search and enable it as well).
- Click the menu button again and select APIs & Services > Credentials.
- On the Credentials page, click + Create Credentials > API key. You can optionally restrict it to Google Sheets API.
- Copy the newly created key and paste it in the apiKey field in your INIT button.
Itch Key
- key which was provided to you on the Itch.io purchase page. You can click on the purchase confirmation link that was sent to your email to retrieve it again. If you have any issues retrieving your key, please join our Discord server and ask for assistance.
Show Alerts
- whether you want to show yellow notification messages for successful requests. If you set it to false, only errors are shown.
- Configure
Google Sheets OPTIONS
commands. Check which Google Sheets commands you wish to use and display in your commands list to prevent clutter.
Default commands which are always available: Get Data, Append Data, Update Data, Batch Update, Find Data, Sort Range.
- Use Create Spreadsheet button to create your first Spreadsheet, as this extension can only modify Spreadsheets specifically created with it (you can create as many as you want).
- Once the Spreadsheet is created, navigate to it in your browser and manually make it public, as the extension cannot otherwise read it.
- (optionally) Go back to your INIT Settings button and fill out the
spreadsheetID
in Set String Variable command if you’re going to use the extension only with one specific SpreadSheet. Your Spreadsheet ID can be retrieved by going to your spreadsheet in the browser and copying it from the URL: https://docs.google.com/spreadsheets/d/YOURSPREADSHEETID/edit?usp=sharing
- Your basic set up is now done and you’re ready to start using the extension! Please review the General Parameters and Buttons tabs on this page as well, as they contain important information regarding each Google Sheet extension command.
A lot of buttons share the same parameters, which are going to be skipped in the Buttons section.
SpreadsheetID
You can either fill it out manually for each button or set up spreadsheetID
variable in your INIT button if you intend to use a single Spreadsheet.
Spreadsheet ID can be retrieved by going to your spreadsheet in the browser and copying it from the URL: https://docs.google.com/spreadsheets/d/YOURSPREADSHEETID/edit?usp=sharing
SheetName
Name of the particular Sheet you want to Get or Edit data in.
The extension automatically converts your sheet name to your sheet ID to make it easier to work with. If you rename a sheet to another sheet's name that previously existed in your SpreadSheet (i.e. Sheet1 becomes Sheet2 and Sheet2 becomes Sheet1), you must completely close and reopen Bridge to reset your session. Otherwise it will still assign the old sheet ID to the name.
Range
Range you wish to Get or Edit data in, such as A1:B10
.
Dimension
Major dimension to Get or Edit data in.
For example, if you use the Get Data command and set the range to A1:B10
and your dimension to ROWS, it will return 10 stacks, each containing one row (first stack will be A1-B1
values, second one A2-B2
values, etc.).
If you change your dimension to COLUMNS, it will return 2 stacks, each containing 1 column (first stack will be A1-A10
values and second stack will have B1-B10
values).
Values (applies to Append Data, Update Data and Batch Update commands)
You can send values to the extension in two different ways:
- A string of values separated by
|
marking individual cells. For example, if you want to insert values in A1:A7 range (make sure dimension is COLUMNS), you can enter them like this: Monday|Tuesday|Wednesday|Thursday|Friday|Saturday|Sunday
.
- A stringified array. All values from the array will be inserted into the selected range, starting from position 0 and ending with the last position.
- Create an array with some entries.
- Use Stringify Array command.
- Insert the stringified array variable in the Values field.
Append by value/array
Appends values to a spreadsheet, either by a single variable or an array. Must be either a single column or single row.
Input box |
Description |
inputType |
How the data should be interpreted. Default is User Entered. |
InsertTypeHow |
How the input data should be inserted. |
Update Data
Same as Append Data command, except it will update (=overwrite) data in the selected range instead of appending them.
Batch Update
This is a very important button to understand if you want to perform update data batch requests. Instead of sending multiple single requests, use Batch Update command instead.
Please remember that you share write request quota with all other users using the extension, so try your best to group up your Update Data
requests.
Input box |
Description |
Amount |
amount of Update Data requests you’re sending |
- Send ‘Google Sheets Batch Update’ command and specify the amount of requests.
- Send all your following Update Data requests as you normally would.
- The extension will queue up the requests and wait for the last request to send them all at once. If you fail to supply all requests within the next 10 seconds, the queue will be deleted and resetted. Simply said, either all requests are sent or none.
Get Data
Retrieves data based on the range and dimension, and saves them into an array.
Input box |
Description |
Render |
How values should be represented in the output. Default is formatted value. |
Delete Empty |
Whether to delete empty values before putting them into the stack. |
saveVariable |
Name of the array for the retrieved data. |
Find Data
Matches a string/value to a cell in a single column or row and returns its coordinates + related values. Must be an exact match. Finds the first occurence only.
Input box |
Description |
Range |
Range to search. Must be exactly one column or one row, i.e. A1:A10 or A1:K1 . |
Find |
string to find (must exactly match the cell contents, case sensitive). There are some exceptions. For example for a date you need to use the following format: DATE(YYYY,MM,DD) (i.e. DATE(2012,1,1) ), see MATCH function. |
Dimension |
select COLUMNS or ROWS depending on whether your range is a column or row. |
Span |
The span of the rows/columns to retrieve. If set to 0 , the whole column/row is returned. If Span is set to 1:5 , it will return row 1-5 if you search by column and column A-E if you search by row. |
saveVariable |
variable to save the cell’s coordinates. Returns an object containing the “cell” key which contains our cell coordinates and the “values” key which is an array containing all the values in the dimension and range specified. If the value is not found, returns an empty string "" . |
Create SpreadSheet
Creates a new SpreadSheet. The extension can only modify spreadsheets specifically created with this command.
Input box |
Description |
Title |
Name for your new SpreadSheet |
saveVariable |
variable to save your new SpreadSheet ID into |
You need to manually make the newly created spreadsheet public.
There will be a hidden sheet added to every spreadsheet you create. This sheet serves as sort of a look up sheet for Find Data command. Please don’t delete or rename it.
Duplicate Sheet
Duplicates an existing sheet.
Input box |
Description |
SourceSheetName |
name of the sheet you wish to duplicate |
newSheetName |
name of the new duplicated sheet |
insertSheetIndex |
where in your SpreadSheet you want to insert the duplicated sheet |
Add Sheet
Adds a new sheet to the selected SfalsedSheet
Input box |
Description |
Name |
name for your new sheet |
Index |
where in your SpreadSheet you want to insert the new sheet |
Hidden |
whether you want to make the sheet hidden |
Copy Paste
Copies data from the source to the destination
Input box |
Description |
Range |
source range to copy |
TargetSheet |
sheet name to paste the data to |
TargetRange |
range to paste the data to |
PasteType |
what kind of data to paste |
PasteOrientation |
how the pasted data should be oriented. Transpose = all rows become columns. |
Auto Fill
Fills in more data based on existing data.
Input box |
Description |
Range |
range to autofill. |
useAlternateSeries |
generate data with the “alternate” series. Differs based on the type and amount of data. |
Find Replace
Finds and replaces data in cells over a selected rfalse.
Input box |
Description |
Range |
range to find/replace over |
Find |
value to search (string). If you want to use regex, prefix the expression with regex . Example: find regex o.* (.*) , replace $1 Hello Your formatting must follow Java regex rules. |
Replace |
value to use as the replacement |
matchCase |
true if the search is case sensitive |
matchEntireCell |
true if the find value should match the entire cell |
Split Text
Splits a column of text into multiple columns, based on a delimiter in each cell.
Input box |
Description |
Range |
the source data range. This must span exactly one column. |
Delimiter |
the delimiter to use. For example :> or ,>. |
Sort Range
Sorts data in rows based on a sort order per column.
Input box |
Description |
range |
the range to sort |
sortOrder |
the order the data should be sorted. |
dimIndex |
the dimension index the sort should be applied to, for example B or 1 (which is the same as B). |
Randomize
Randomizes the order of the rows in a selected rfalse.
Input box |
Description |
Range |
the range to randomize |
Merge Cells
Merges cells for row or column.
Input box |
Description |
Range |
the range of cells to merge |
mergeType |
how the cells should be merged. MERGE_ALL creates a single merge from the range. MERGE_COLUMNS will create a merge for each column in the range. MERGE_ROWS will create a merge for each row in the range. |
Unmerge Cells
Unmerges previously merged cells.
Input box |
Description |
Range |
The range within which all cells should be unmerged. If the range spans multiple merges, all will be unmerged. The range must not partially span any merge. |
Clear Data
Clears all data in the selected rfalse.
Input box |
Description |
Range |
range to clear the data from. Example: A1:A10 . |
Insert Range
Inserts cells into a range, shifting the existing cells over or down.
Input box |
Description |
Range |
range to insert new cells into |
Shift |
dimension to be shifted when inserting cells. ROWS = shifted down. COLUMNS = shifted right. |
Delete Range
Deletes a range.
Input box |
Description |
Range |
the range of cells to delete |
Shift |
ROWS = existing cells will be shifted upward, COLUMNS = cells will be shifted left |
Delete Duplicates
Removes rows within this range that contain values in the specified columns that are duplicates of values in any previous row. Removes duplicates with different letter cases, formatting, or formulas.
Input box |
Description |
Range |
the range to remove duplicates rows from. |
Dimension |
dimension to analyze for duplicate values |
StartIndex |
The start (inclusive) of the span. The columns in the range to analyze for duplicate values. |
EndIndex |
The end (exclusive) of the span. The columns in the range to analyze for duplicate values. |